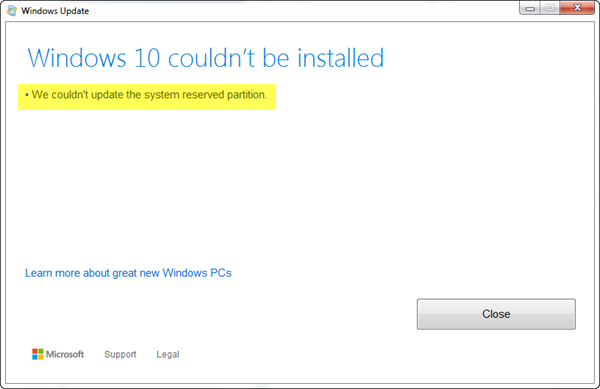
We couldn’t update the system reserved partition
You might be wondering what is causing this problem, and if there’s a way to fix it. We’re here to say yes, there is a way, and it’s quite simple to accomplish. Just put aside a few minutes of your time and you’ll fix the issue in no time.
What is the cause?
You see, the System Reserved Partition (SRP) may be too full. Bear in mind that the System Reserved Partition (SRP) is just a small space on your hard drive, and it is designed to store boot information for Windows 10. Not only that, but anti-virus and other security apps usually write to the SRP, and that can cause the space to hit its limit before long. There’s nothing much one can do about this issue at the moment. It all comes down to whether or not Microsoft can come up with a better solution that can free up SRP space.
Fix Error 0xc1900104 or 0x800f0922
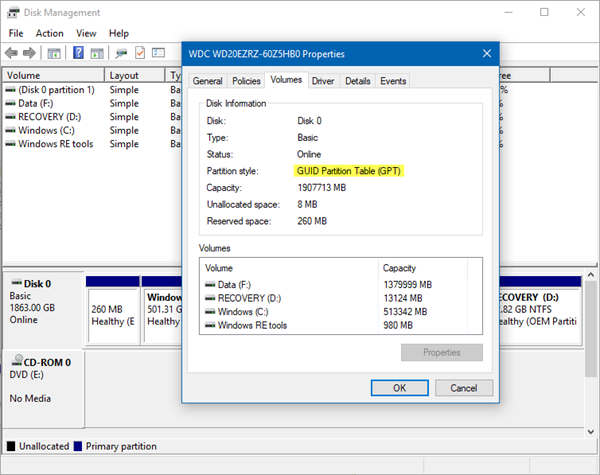
These steps are not complicated, but it comes with the possibility of risk since you’ll be playing around with the system reserved boot partition area. Now, if you want to upgrade to Windows 11/10, you’ll first need to free up 15MB of space on the SRP then take the steps to upgrade again. However, if you’re updating Windows 11/10, simply free up 13MB of space then proceed to try again. To do this, press the Win+R. When the Run window appears, be sure to type diskmgmt.msc and press Enter.
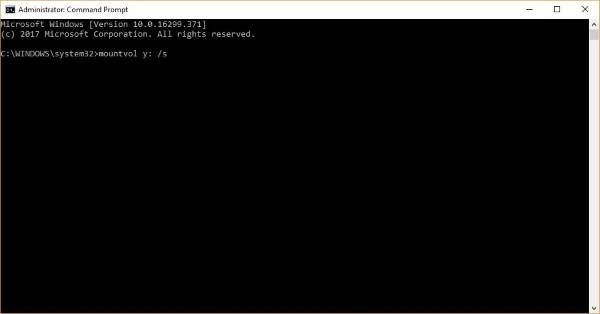
The following step, then, is to right-click on the Disk (such as Disk 0) that holds the SRP, and select Properties. Next, you’ll need to choose the Volumes tab, then this where the Partition Style. It will say either GUID Partition Table (GPT) or Master Boot Record. You’ll need to select the one you’re using. It’s either GPT or MBR. The solution for Windows 10 with GPT partition First, the user must fire up the Command Prompt. Click on the Search or Cortana button, type the word “Command Prompt” then press-and-hold or right-click on Command Prompt in the results, and select Run as administrator. In the command prompt, type the following and then hit Enter.
This procedure will add the Y: drive letter to gain access to the System Partition. Change to the Y drive by typing and press Enter. Then, steer to the Fonts folder by typing Once you’re there, type to delete Font files. The system may enquire if you are sure to continue, press Y and then Enter to move on. This should help! See this post if: System Reserved Partition is missing in Windows
The solution for Windows 11/10 with MBR partition
Press the Windows key + R. In the Run window that comes up, type diskmgmt.msc and press Enter. Next, be sure to select the partition marked System Reserve. Right-click on it and select Change Drive Letter and Paths. Choose Add, then Enter Y for the drive letter, and finally click OK. From the Start menu, search for cmd. Right-click Command Prompt from the search results, and select Run as administrator. In the command prompt, type Y: and hit enter to switch to that drive. Then, navigate to the Fonts folder by typing cd Boot\Fonts. Type the following and press Enter: You must include the space and the period after the “f”, or the command will not work properly. Back up the permission to the drive by typing the following and press Enter: Note: Make sure that all files are shown as successful and none has failed. Type whoami and press Enter, and then record the username. Type the following command and press Enter: Do not put a space between the username and “:F”, or the command won’t work. Make sure you are still located in Fonts location (Y:\Boot\Fonts) as described above. Then, Type del . to delete font files. The system may ask you if you are sure to continue, press Y and then enter to continue. Before careful, a mistake could turn out to be expensive. Read: Fix Windows Update Error 0xc1900104 when installing Feature Update.